Developing an iOS App is So Easy: Here Is A Step To Step Guide
The world of mobile applications is constantly evolving, with iOS apps continuing to dominate the industry due to Apple’s extensive user base and premium ecosystem. Developing a successful iOS application requires a structured approach, covering everything from idea validation to coding, testing, and marketing. This comprehensive guide will walk you through each phase of iOS app development, ensuring that you create an app that is functional and competitive in the App Store.
Step 1: Define Your IOS App Idea

Every successful iOS app begins with a well-defined idea. It is essential to have a clear vision of what you want to achieve and how your app will solve a specific problem for users.
Points to be Considered:
- What specific problem does my IOS app address?
- Who is my target audience, and what are their preferences?
- What sets my app apart from existing competitors?
Do Proper Market Research
To ensure your idea has potential, conduct thorough market research using the following tools:
- Google Trends: Analyze the demand for your iOS app’s concept.
- App Store and Play Store: Study similar apps, their reviews, and areas where they fall short.
- Quora and Reddit: Understand common user pain points and gain insights into potential improvements.
- Competitor Analysis: Identify gaps in competitors’ offerings and determine how your app can provide a better solution.
Once you validate your idea, define the core features that will provide value to users while maintaining a unique edge over existing applications.
Step 2: Learn the Fundamentals of iOS App Development
If you are new to ios app development, gaining a basic understanding of iOS app development will be beneficial, even if you plan to hire developers.
Essential Technologies For Development Use:
1. Swift:

Swift is Apple’s primary programming language for iOS, macOS, watchOS, and tvOS applications. It was introduced in 2014 as a successor to Objective-C, designed to be safer, faster, and more efficient. Swift is an open-source language that focuses on performance and ease of use, making it ideal for both beginners and experienced developers.
- Safety and Reliability: Swift eliminates common programming errors like null pointer dereferencing and buffer overflows, reducing app crashes.
- Performance: It is optimized for speed and uses modern compiler techniques to ensure fast execution.
- Expressive Syntax: The language is concise and readable, making it easy to learn and write clean code.
- Memory Management: Swift includes Automatic Reference Counting (ARC) to manage memory efficiently.
- Interoperability with Objective-C: It can be integrated with older Objective-C codebases, allowing developers to transition smoothly.
Example of Swift Code
import UIKit

let greeting = "Hello, Swift!"
print(greeting)
This simple code prints a message using Swift. Swift’s syntax is straightforward, making development quicker and easier.
2. Xcode:

Xcode is Apple’s official Integrated Development Environment (IDE) for building apps for iOS, macOS, watchOS, and tvOS. It includes everything needed to design, develop, and debug applications.
- Code Editor: Supports Swift, Objective-C, and other languages, offering syntax highlighting and code suggestions.
- Interface Builder: A drag-and-drop tool to design app interfaces visually without writing code.
- Simulator: Allows developers to test their apps on different iPhone and iPad models without a physical device.
- Debugging Tools: Provides real-time debugging, breakpoints, and performance monitoring tools.
- Version Control: Supports Git integration for tracking changes and collaborating with teams.
Xcode is the only official tool for submitting apps to the App Store. It ensures that developers adhere to Apple’s guidelines while providing robust tools for app optimization and testing.
3. SwiftUI and UIKit

SwiftUI and UIKit are frameworks used for building user interfaces in iOS applications. While both serve the same purpose, they differ in approach and functionality.
UIKit (Traditional UI Framework)
UIKit is Apple’s older framework for building user interfaces. It is based on an object-oriented approach and requires developers to manage UI components manually.
- Uses UIViewController to manage screens.
- Supports Auto Layout for responsive designs.
- Requires handling of UI updates manually using delegate patterns and event-driven programming.
- Offers more control and is widely used in existing projects.
Example of UIKit Code:
import UIKit

class ViewController: UIViewController {
    override func viewDidLoad() {
        super.viewDidLoad()
        let label = UILabel()
        label.text = "Hello, UIKit!"
        label.frame = CGRect(x: 50, y: 50, width: 200, height: 50)
        view.addSubview(label)
    }
}
SwiftUI (Modern UI Framework)
SwiftUI is Apple’s newer framework introduced in 2019 to simplify UI development. It is declarative, meaning developers describe what they want the UI to look like, and SwiftUI handles rendering and updates automatically.
- Uses a declarative syntax, making it easier to write and understand.
- Provides automatic UI updates based on state changes.
- Integrates seamlessly with Swift, reducing boilerplate code.
- Supports live previews in Xcode for real-time design changes.
- Works across all Apple platforms with a single codebase.
Example of SwiftUI Code:
import SwiftUI

struct ContentView: View {
    var body: some View {
        Text("Hello, SwiftUI!")
            .padding()
            .font(.title)
    }
}
This code creates a simple interface with a text label in just a few lines.
Comparison: UIKit vs. SwiftUI
| Feature | UIKit | SwiftUI |
|---|---|---|
| Programming Style | Imperative (manual updates) | Declarative (automatic updates) |
| Ease of Learning | Requires more effort | Beginner-friendly |
| Performance | Optimized but requires more code | Efficient with built-in optimizations |
| Live Preview | Not available | Available in Xcode |
| Best for | Large, complex applications with custom UI needs | New apps, rapid prototyping, and cross-platform development |
Recommended Learning Resources:
- Swift Playgrounds: A beginner-friendly platform for learning Swift interactively.
- Hacking with Swift: A website offering free coding tutorials and project-based learning.
- Apple’s Developer Documentation: Comprehensive resources for developers to understand iOS development standards and best practices.
Understanding these fundamentals will empower you to make informed decisions during the development process, even if you collaborate with professional developers.
Step 3: Design Your IOS App’s User Interface and Experience

A well-designed user interface (UI) and a smooth user experience (UX) are crucial for an app’s success. Apple has strict guidelines to ensure consistency across applications, so adhering to them is essential.
Best Practices for UI and UX Design:
- Maintain a simple and intuitive design.
- Ensure smooth navigation with clear call-to-action (CTA) buttons.
- Follow Apple’s Human Interface Guidelines to improve user experience.
- Optimize for different screen sizes and ensure responsiveness.
- Prioritize accessibility for users with disabilities.
Useful Design Tools:
1. Figma
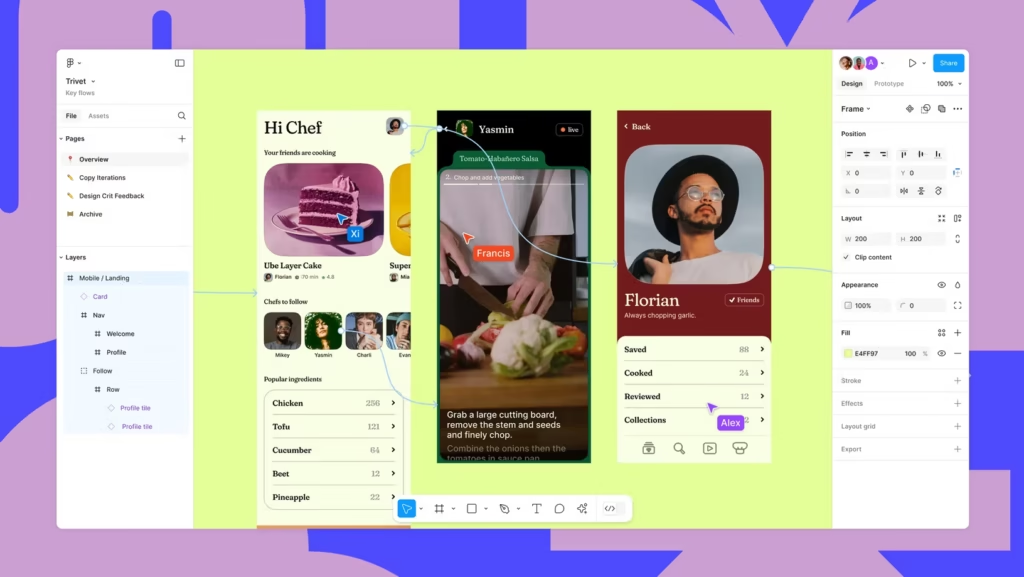
Figma is a cloud-based design tool widely used for wireframing, prototyping, and UI/UX design. It enables real-time collaboration, making it a popular choice among design teams and developers.
- Cloud-Based Collaboration: Multiple users can work on the same design in real time.
- Cross-Platform: Runs directly in the browser and has desktop apps for macOS and Windows.
- Prototyping: Allows designers to create interactive prototypes without writing code.
- Version Control: Tracks changes and allows designers to revert to previous versions.
- Plugins and Integrations: Supports a variety of plugins for icons, stock images, and design automation.
Figma is ideal for teams that need seamless collaboration. It eliminates the need for constant file sharing and provides a centralized workspace for design and feedback.
2. Sketch
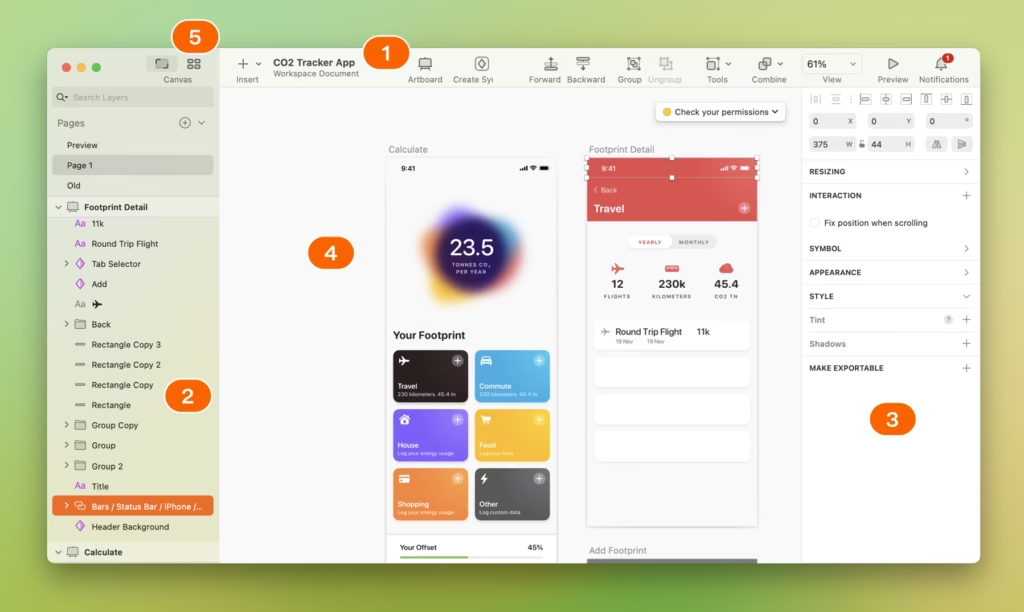
Sketch is a vector-based design tool primarily used for creating UI/UX designs for iOS applications. Unlike Figma, Sketch is a macOS-exclusive application, making it popular among Apple developers.
- Vector Editing: Enables precise control over UI elements with scalable vector graphics.
- Reusable Components: Supports symbols and styles that help maintain design consistency.
- Offline Functionality: Unlike Figma, Sketch can be used without an internet connection.
- Third-Party Plugins: Integrates with various extensions for enhanced functionality.
- Exporting for Development: Allows easy export of assets in multiple formats for developers.
Sketch is a great choice for macOS users who need a powerful yet lightweight tool for designing iOS applications. It offers better offline performance compared to Figma.
3. Adobe XD
![]()
Adobe XD is a UI/UX design tool developed by Adobe, known for its high-fidelity mockups, prototyping, and seamless integration with Adobe Creative Cloud.
- Interactive Prototyping: Allows designers to create animated and interactive prototypes.
- Voice Prototyping: Supports voice-based interactions for smart applications.
- Cross-Platform Support: Works on both macOS and Windows.
- Integration with Adobe Tools: Syncs with Photoshop, Illustrator, and other Adobe applications.
- Repeat Grid Feature: Speeds up the design process by duplicating elements efficiently.
Adobe XD is best for designers who already use Adobe products and need advanced high-fidelity prototypes with animations and transitions.
Comparison: Figma vs. Sketch vs. Adobe XD
| Feature | Figma | Sketch | Adobe XD |
|---|---|---|---|
| Platform | Web-based (Mac & Windows) | macOS only | Mac & Windows |
| Collaboration | Real-time cloud collaboration | Limited (requires plugins) | Shared cloud documents |
| Best for | Team-based design & prototyping | macOS users focused on UI design | High-fidelity mockups & Adobe users |
| Offline Work | Requires internet | Full offline support | Supports offline mode |
| Plugins & Integrations | Extensive plugin support | Strong macOS plugins | Seamless Adobe integrations |
Choosing the right tool depends on your workflow, team collaboration needs, and platform preferences. Before developing, create wireframes and prototypes to visualize your app’s structure and functionality.
Step 4: Develop Your iOS Application
Once your design is finalized, you can proceed with coding your application.
Steps to Build an iOS App:
1. Open Xcode and Create a New Project
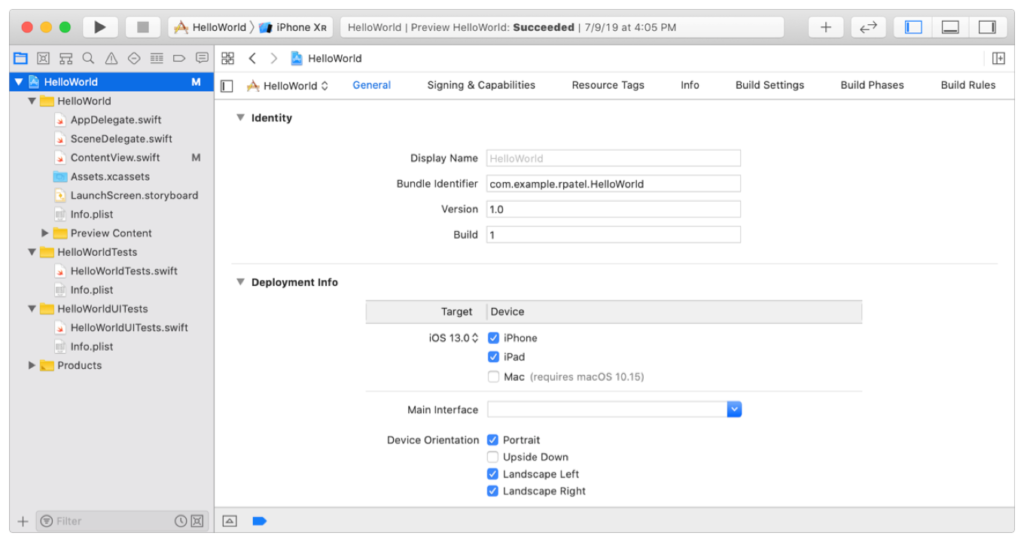
Xcode is Apple’s official Integrated Development Environment (IDE) for iOS app development. It provides all the tools necessary to write, test, and debug iOS applications.
Steps to Create a New Project in Xcode:
- Open Xcode on your Mac.
- Click on “Create a new Xcode project.”
- Choose the appropriate template (e.g., App, Game, Document-based app).
- Select Swift as the programming language.
- Choose between SwiftUI or UIKit for building the UI.
- Configure project settings such as the App Name, Bundle Identifier, and Organization Name.
- Choose an iOS deployment target (the minimum iOS version that supports your app).
- Click Create, and Xcode will generate the basic project structure.
This sets up your development environment and creates necessary project files, such as AppDelegate.swift, SceneDelegate.swift, and ViewController.swift.
2. Choose SwiftUI or UIKit Based on Your App’s Design Requirements
When developing an iOS app, you must choose between SwiftUI and UIKit, Apple’s two primary UI frameworks.
SwiftUI
- Introduced in iOS 13, SwiftUI is a declarative UI framework that simplifies UI development.
- Uses a code-driven approach, reducing the need for Storyboards.
- Ideal for new projects and cross-platform (iOS, macOS, watchOS, tvOS) development.
- Uses a simple “state-driven” approach for managing UI changes.
UIKit
- A mature, imperative UI framework that has been in use since the early days of iOS.
- Uses ViewControllers and Storyboards for UI design.
- Offers greater control over animations and custom UI components.
- Recommended for complex, enterprise-level apps that require fine-tuned UI adjustments.
Which One to Choose?
- If you are building a new IOS app, SwiftUI is a modern, easy-to-learn choice.
- If your app requires complex animations, legacy support, or custom UI elements, UIKit is a better fit.
3. Develop Core Features (Authentication, Data Handling, Navigation)
Once your UI framework is selected, you need to build the essential features of your app.
User Authentication
Adding secure login options helps protect user data. Common authentication methods include:
- Sign in with Apple (recommended for iOS apps).
- Google/Facebook Authentication (via Firebase).
- Email and Password Authentication (traditional method).
Example using Firebase Authentication in SwiftUI:
Auth.auth().signIn(withEmail: "user@example.com", password: "password123") { authResult, error in
    if let error = error {
        print("Error signing in: \(error.localizedDescription)")
    } else {
        print("User signed in successfully")
    }
}
Data Handling
Your app may need to store and retrieve user data. Common data handling options include:
- Core Data: Apple’s native framework for storing structured data locally.
- UserDefaults: Stores small pieces of data like preferences and settings.
- Firebase Firestore: A cloud-based database that syncs across devices.
Example of storing user data in Core Data:
let newUser = User(context: context)
newUser.name = "John Doe"
try? context.save()
Navigation
Your app should have smooth navigation between screens.
- In SwiftUI, use
NavigationViewandNavigationLink:
NavigationView {
    NavigationLink(destination: DetailView()) {
        Text("Go to Details")
    }
}
- In UIKit, use
UINavigationControllerto handle screen transitions.
4. Implement Backend Services (Firebase or Custom Server)
If your app requires real-time updates, cloud storage, or API integration, you’ll need backend services.
Option 1: Firebase (Google’s Backend-as-a-Service)
Firebase provides:
- Authentication (Login/Signup).
- Realtime Database (NoSQL database for syncing data).
- Cloud Firestore (Advanced database for structured data).
- Cloud Storage (For storing images, videos, and files).
Example of fetching data from Firebase Firestore:
let db = Firestore.firestore()
db.collection("users").getDocuments { snapshot, error in
    if let documents = snapshot?.documents {
        for document in documents {
            print("\(document.documentID) => \(document.data())")
        }
    }
}
Option 2: Custom Backend (Node.js, Python, PHP, etc.)
If you need a fully customized backend, you can:
- Build a REST API using Node.js (Express), Django, or Laravel.
- Host it on a cloud service like AWS, Google Cloud, or DigitalOcean.
- Use APIs to fetch and update data via
URLSessionthird-party libraries like Alamofire.
Example API call using URLSession:
let url = URL(string: "https://api.example.com/data")!
URLSession.shared.dataTask(with: url) { data, response, error in
    if let data = data {
        print("Received Data: \(data)")
    }
}.resume()
5. Test the IOS App Using Xcode’s Simulator
Before launching your app, testing is crucial to ensure smooth performance and bug-free functionality.
Types of Testing in Xcode:
- Unit Testing: Ensures individual components function correctly.
- UI Testing: Simulates user interactions to check navigation and responsiveness.
- Beta Testing: Use TestFlight to get real user feedback before launching.
Using Xcode’s Simulator
- Open your project in Xcode.
- Click on the device selector at the top and choose a virtual iPhone/iPad.
- Press
Cmd + Ror click Run to launch the app in the simulator. - Test different functionalities like UI navigation, authentication, and API requests.
- Debug using Xcode’s Debug Console and Breakpoints.
Tip: Always test on multiple iPhone models to ensure compatibility across different screen sizes.
Essential Features to Consider:
- User Authentication: Implement sign-in options via Apple ID, Google, or email.
- Push Notifications: Engage users with timely updates.
- Offline Functionality: Allow users to access content even without an internet connection.
- Security Measures: Encrypt sensitive user data to protect privacy.
If coding seems overwhelming, consider hiring an experienced iOS developer or utilizing no-code/low-code platforms like Adalo or Bubble.
Step 5: Test Your IOS App Thoroughly
Rigorous testing is essential to ensure your app delivers a seamless user experience.
Types of Testing:
- Unit Testing: Verifies that individual components function correctly.
- UI Testing: Ensures smooth navigation and interaction within the app.
- Beta Testing: Allows real users to test the app and provide feedback using TestFlight.
Common Issues to Address:
- Application crashes and unexpected bugs.
- UI inconsistencies across different iPhone and iPad models.
- Security vulnerabilities and potential data breaches.
Thorough testing minimizes errors and ensures a polished final product before submission.
Step 6: Submit Your IOS App to the App Store
To publish your application, enroll in Apple’s Developer Program, which requires an annual subscription fee.
Steps for Submission:
- Prepare a compelling App Store Listing, including an engaging description and high-resolution screenshots.
- Upload your application via App Store Connect.
- Ensure compliance with Apple’s App Review Guidelines to avoid rejection.
Apple’s review process can take several days, so be prepared to address any feedback or modifications required for approval.
Step 7: Market and Monetize Your Application
A well-developed app requires strategic marketing to gain visibility and attract users.
Effective Marketing Strategies:
- App Store Optimization (ASO): Use relevant keywords in your app’s title and description.
- Social Media Promotion: Leverage platforms like Instagram, Twitter, and LinkedIn to reach potential users.
- Influencer Marketing: Collaborate with industry influencers to promote your app.
- Press and Blogs: Get your app featured on technology websites like TechCrunch and Product Hunt.
Monetization Models:
- Freemium: Offer a free app with premium in-app purchases.
- Subscription-Based: Charge users a recurring monthly or yearly fee.
- Advertisements: Integrate in-app ads to generate passive income.
Continually analyze user feedback and optimize your marketing efforts to drive sustained growth.
Developing a successful iOS app requires meticulous planning, technical expertise, and a strategic marketing approach. By following this step-by-step guide, you can transform your idea into a fully functional app that meets industry standards and user expectations. Whether you are an independent developer or a business owner, continuous improvement and adaptation are key to ensuring long-term success in the competitive app marketplace.